Sunday, December 11, 2016

Are you ready for Christmas??

I just finished the second quilt I am giving this Christmas.  Several years ago I put together a quilt from the Jewel Box traditional pattern.  Here is a picture of it then.  I had about 2 yards of the watercolor native american yardage.  I used thea prominent colors of that to choose other pieces to go with it.  One piece was used for all the diagonal squares.  It was a tie die pattern that contained the red/orange, green/aqua colors.  I used a grey for the background and orange for the borders and center squares. I used what was left of the squares for the added top and bottom border of squares.   I had a small handful of scraps left over when I was done.  I even had to piece the outer border from what was left over from the 9 fussy cut centers.


Here are some pictures of what it is like to push this quilt through my domestic machine.  It is 72 inches by 80 inches.  After several days of quilting (I think I am kind of slow) my hands, arms and shoulders are very tired and sore.  But I got it done in time for Christmas.  


I used some red fabric from my stash for the backing and bound it with a flange binding combining the red and some grey.  I think it turned out pretty good.  I don't do free motion very good and used only a walking foot for this quilt.


Because my sewing space takes up about 1/3 of our living room, my sister always uses my big work table to put up her Christmas tree and village display, so I have cleaned up the space for her now.  I have other Christmas related sewing to do, but it is all very small compared to the two quilts I did for this year.

Merry Christmas.  I may not post again until after the first of the year, so Happy New Year also.

Susan

Monday, November 28, 2016

First Christmas Quilt Finished!!

I usually cut up any fabric scraps that are smaller than an eighth of a yard into squares.  I have a box of squares that I pick from when I am doing a scrappy quilt.  They range in size from 2 inches to 5 inches.  A couple of year ago, I started making half square triangles from some of the 3 inch squares, half light and half dark.  I would make a few when I had a little time, then trim them to make 2 1/2 inch squares.  I'd stack them up until I had a hundred, then bundle then together with string.  When I had what I figured were enough to make an ocean waves quilt, I started making the blocks, again just a few at a time.  Last summer I counted the blocks and I finally had enough for a double size quilt.  Since these were quite literally scraps, I am afraid I was not as accurate as I usually  try to be.  It was going to be a utility quilt for picnics and such.  Or an extra quilt if someone stayed over night.

For the last few years I have been making quilts for family members, I had planned on making a dragonfly quilt for my sister that I live with, but she wanted the ocean waves quilt when I got the top done.  I usually try to make the larger quilts in 2 or three pieces, because I only have a home machine, and I don't have a very big space to push a quilt through.

Here is the start of laying out the blocks.

I did the quilt in two parts with a seam across the middle.  I quilt within about 1 1/2 inches of the seam line.  After the quilting is done, I seam the two haves together.  First the top is seamed together, then I cut the batting to meet, and whip stitch it together.  Then cut the backing so that it overlaps just off center from the previous seams, to reduce the bulk.  Then that seam is hand stitched down.  Then the hard part is finishing the quilting that was left unquilted.  I quilted the borders last.  Then  binding and it is done.  It is also cat approved. I gave it to her last week.  She loves it.  When I get some other projects done, I may do that special dragonfly quilt for her anyway.


Scamp (on the pillows) and Kali say it is just right.


That's all for now. Happy quilting!!
Susan

Friday, November 25, 2016

Fantasy Road Signs
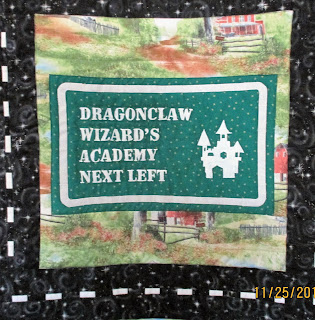
A couple of years ago, my quilt guild had a challenge to create a Road Sign quilt.  I got the top done for the show and tell, but didn't get the quilting finished until October 31, Halloween, of this year.  Here are some photos of my finished quilt.   I wanted to do something a little different from regular road signs.


Here are the individual blocks:


I loved searching the internet for silhouettes to use for the crossing signs. I used fusible to apply all but the letters, they were painted on.  I then used satin stitch to secure the silhouettes and the black edges down. 

These are the information signs.  I came up with 4 signs that went with the crossing signs. 


 I used an interesting fabric of swirls and stars for the road.  The white lines of the road is a white and silver sparkle fabric.  I was puzzled what to use for a background fabric.  I didn't want to use a solid, too boring.  I finally found the country fabric that looks pretty good and is not boring.  For the green signs, I tried printing out the designs on the fabric.  It didn't look very good.  So I got some fabric paint and painted over the printed signs to make it show up.  I used a fusible to attach the white edges on the information signs and then used a satin stitch to secure it permanently.

I didn't have any of the black road fabric when I got around to the back, but I did have another patterned black fabric.  The back is a dark green solid, with a 9 inch wide version of the road running from top to bottom.   

I tried to outline the individual words in free motion quilting, but after 3 tries that I hated, I just outlined the lines of  words instead.  the rest was quilted in simple lines.  I think it turned out pretty good.  


Thursday, September 8, 2016

Butterflies!!!!!
I have been working on a new quilt with appliqued butterflies and pieced flowers.  Here is the EQ design.  I will be changing the colors in the final quilt.

I had a lot of trouble piecing the flowers so changed the patterns to paper pieced blocks. Problem solved.


Here are some the the 12 appliqued butterflies.


These were all in the blues and aquas.  I ave also used reds, yellow, orange, etc. Also, each pair are mirror images of the patterns, but not the colors.


Sunday, September 4, 2016

About a year ago, July or August,  I was talking to my sister Louise.  I was telling her I would be putting two quilts in the East Idaho State Fair, one was Davids Wild Jewels, that I made for him last year. She asked when she was going to get a quilt from me.  I had been planning to do a lone star quilt as a gift for Christmas.  Her husband is from Texas.  She immediately asked for a red and white quilt. My heart sank, because the Lone star quilt was one I had done a few years ago and only needed to be quilted.  "Wouldn't you like a nice starburst quilt with yellow and other fall colors?" No, she had her heart set on a red and white quilt. OK...

I didn't have much red in my stash.  Orange and red are not my favorite colors.  So I started acquiring red fabrics.  While doing that, I started looking at patterns and finally decided on a feathered star quilt.  I only have a domestic machine, so I usually sew larger quilts in strips, sort of like quilt as you go.  David and Mike's quilts were done in strips.  I quilt the strips of blocks leaving about 1-2 inches unquilted where the strips join Then I sew the top pieces together, join the batting with strips of lightweight fusible interfacing and then join the backing by hand.  Turn it over and finish the quilting over the new seamline, go on to the next strip, etc.  This makes a secure join of the strips and is not very noticeable.

Here is the EQuilt pattern:


I did the split between the top and bottom rows of 16 inch star blocks and the center block and its two flanking blocks: 3 widthwise strips to quilt. By the way, the center of the large center star is also a feathered star 9.25 inches square.  It replaces the white octagon in the center.  I also split the borders and quilted the long side borders after joining the strips.  The print I used for the outside border hardly shows the fact that it is in three pieces.  As usual, I didn't get a good picture of the quilt when it was finished.  I had to mail it right away to get to Virginia in time. Here are the pictures I did take:

  Just getting started with the blocks. See the tiny feathered star in the center of the 33 inch center star. I love paper piecing. I used it for all the 16 inch starts too.  I used it for the "feathers" of the large star.

  Tiny machine, big star.  I did feathered circles and half circles in the white spaces.


Above, the joins in the print border are not even noticeable.


These are the best pictures I have of this quilt.  I want to do another feathered star (glutton for punishment) and do the center as a color wheel with a different color in each star point,  and each outside star in a corresponding color.   That's on my bucket list for now.


At one of the quilt guild meetings, I won a packet of 5 inch squares.  I generally don't buy anything smaller than fat quarters.  I was puzzled what to do with them.  The colors were very bright and fun.  I looked through my stash and found plain colors that matched the blocks and made little fans.  I used a rainbow rickrack on the curves and a piano key border from the solids.  It hasn't been quilted yet, but it turned out nice. I showed it off at the next quilt guild meeting. I bought enough of the rainbow rick rack to use in the binding, too.


Here are some of the quilts I have done in the past few years.

Here is a quilt I made for my brother David.  He is a wildlife biologist for the Forest Service here in southern Idaho.  I had the animal picture fabric for years.  You never know when something will be just the right fabric!  I wish I had a better picture.  You can just see the youngest members of the guild holding it up for the guild to see.


When I was just about done with David's quilt, I asked my other brother, Mike, what kind of pattern he was interested in, and he pointed to this quilt, finished and folded on the back of the couch, and said I want that one.  I think it is very nice. His version of "very pretty".  So I said he could have it on Christmas, when we gave out the presents.  Again, I don't have very good pictures.